In this tutorial, we will cover how to measure a STL 3D model using 3DVieweronline. STL 3D models are widely used in various applications such as 3D printing, computer-aided design (CAD), and computer-aided manufacturing (CAM). Accurate measurements are crucial in these applications to ensure the proper fit and function of parts and components.

To begin, you will need to upload your STL 3D model to 3DVieweronline. The platform supports various file formats, including STL, OBJ, PLY, STEP and IGES with a maximum file size of 50 MB for free users. Click the “Upload” button on the top right corner of your account page and select (or drop) your 3D model file to upload.
Once your model is uploaded, open it and locate the measurement tool in the 3DVieweronline interface. You can find it on the left side of the screen, represented by a ruler icon. Click the ruler icon to open the measurement tool options, which include distance between two points, overall size and diameter.
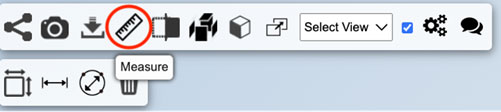
Choose the desired measurement type by clicking on the corresponding icon. Each measurement type has its specific applications, such as determining the distance between two points, calculating the overall size of the 3D model, or measuring the diameter of a circular feature.
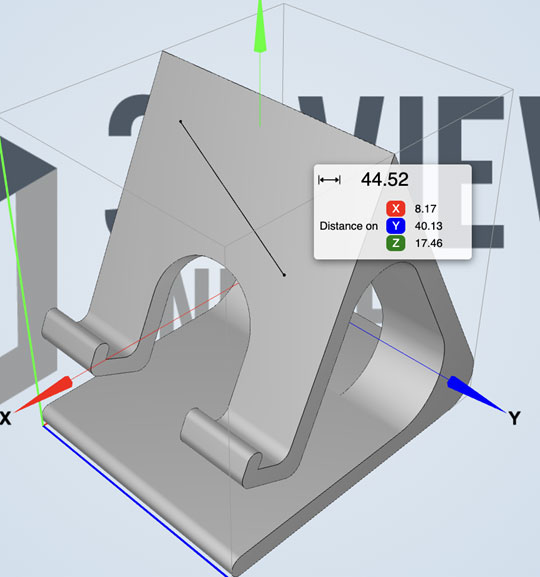
To take a measurement between points, click on the starting point on the 3D model, and then click on the endpoint. The measurement value will be displayed between the two points. To increase precision, you can zoom in on the model to better see the details.
To calculate the overall size of the 3D model, click on the Overall Size icon. The 3D model’s size along the 3 axis will be displayed. The overall volume of the 3D model will also be visualized.
To measure the diameter through 3 points, click on the first point on the 3D model, then click on the second point and finally on the third point. A circle passing through those 3 points will be displayed together with its diameter’s value. To increase the accuracy of the measurement, try to select 3 points which are equally spaced along the circular feature you want to measure.
To remove the measurements from the screen, click on the bin icon.
In this tutorial, we have covered how to measure a STL 3D model using 3DVieweronline. Being able to measure 3D models accurately is essential in various fields, such as 3D printing, CAD, and CAM. We encourage you to explore other features and functions of 3DVieweronline to improve your 3D modeling skills further.